
Introduction: PC Ready for Windows 11
Thinking about upgrading your PC? PC Ready for Windows 11 might be the next step. It offers new features, better speed, and a fresh look. But before you install, one big question remains. Is your PC Ready for Windows 11?
This guide will help you find out. Step by step, we’ll show you what to check. We’ll also explain how to upgrade. Ready? Let’s begin.
What’s New in Windows 11?
Before we dive into requirements, let’s look at what’s new. PC Ready for Windows 11 brings big improvements.
-
A new Start menu
-
Snap Layouts for multitasking
-
Better performance on new devices
-
Faster updates
-
Stronger security
All of these features make daily use easier. But they also need the right hardware.
Why You Should Check Compatibility First To PC Ready for Windows 11
You might be excited to try PC Ready for Windows 11. But not every PC will support it. Microsoft has set new requirements. These make Windows 11 faster and safer. Still, older devices may fall short.
That’s why checking your PC’s specs first is key. It saves time and avoids upgrade errors. Plus, you’ll know if you need a hardware update your PC Ready for Windows 11.
Minimum System Requirements
Here’s what Microsoft says your PC must have:
-
1 GHz or faster processor with 2 or more cores
-
4 GB RAM or more
-
64 GB of storage or more
-
UEFI firmware with Secure Boot
-
TPM version 2.0
-
DirectX 12 compatible graphics
-
9-inch or larger display with HD resolution (720p)
-
Internet connection for updates and setup
These may look simple, but two items often block upgrades—TPM 2.0 and Secure Boot.
What is TPM 2.0?
TPM stands for Trusted Platform Module. It’s a chip that helps with security. It stores encrypted data, like passwords and keys.
Most modern PCs have it. But sometimes it’s turned off. You can enable it in BIOS. We’ll explain how in a later section.
What is Secure Boot?
Secure Boot helps stop malware when your PC starts up. Like TPM, it’s a BIOS setting. Windows 11 needs it turned on to install.
Don’t worry. Turning it on is easy. We’ll guide you through it. So get your PC Ready for Windows 11
How to Check If your PC Ready for Windows 11
Let’s now see how to check your system.
1. Use Microsoft’s PC Health Check Tool
This is the easiest method. It’s free and quick.
-
Download the PC Health Check app from Microsoft
-
Install and run it for PC Ready for Windows 11
-
Click “Check now” under the Windows 11 section
If your PC passes, great! If not, the tool tells you what failed.
2. Try WhyNotWin11 Tool (Optional)
This is an open-source alternative. It gives more details than Microsoft’s tool.
-
Download it from GitHub
-
Run the program for PC Ready for Windows 11
-
Check the green and red status for each component
It’s useful if Microsoft’s tool is unclear.
How to Enable TPM 2.0 and Secure Boot
If these are disabled, you’ll need to go into BIOS. Here’s how:
Step-by-step:
-
Restart your PC
-
While it boots, press a key (like F2, F10, Delete, or Esc—varies by brand)
-
Enter BIOS settings
-
Find the Security or Advanced tab
-
Enable TPM (may be called “PTT” on Intel or “fTPM” on AMD)
-
Find Secure Boot and enable it
-
Save and exit BIOS
Your PC will now meet the key requirements.
What to Do if Your PC Isn’t Compatible
If your PC fails the check, don’t worry. You have a few options:
-
Buy a new PC that supports Windows 11
-
Upgrade your hardware (new motherboard or TPM module)
-
Stick with Windows 10 for now—it’s supported until 2025
-
Install Windows 11 unofficially (not recommended for most users)
For most people, the easiest way is to buy a compatible license and install on supported hardware.
PC Ready for Windows 11
Back Up Before You Upgrade
Before any upgrade, backup your files. Use an external drive or cloud storage. Windows also has built-in tools:
-
File History
-
OneDrive
-
Backup and Restore (Windows 7)
Backing up ensures you don’t lose anything important.
How to Upgrade to Windows 11
Once your PC is ready, here’s how to upgrade.
Option 1: Windows Update
If your PC is eligible, you’ll see the upgrade in Settings > Update & Security > Windows Update.
Click “Download and Install” to begin.
Option 2: Installation Assistant
Visit Microsoft’s site and download the Windows 11 Installation Assistant. Follow the steps to upgrade.
Option 3: Clean Install
This wipes your system and starts fresh.
-
Use the Media Creation Tool from Microsoft
-
Create a bootable USB drive
-
Restart your PC and boot from USB
-
Follow setup instructions
Clean installs take more time but offer a clean slate.
Where to Get a Genuine Windows 11 Key
Once your PC Ready for Windows 11, you’ll need an activation key. Some PCs already have one. Others will need a new key.
You can find affordable and genuine licenses online. One trusted option is Windows 11. Make sure to choose the right edition—Home or Pro.
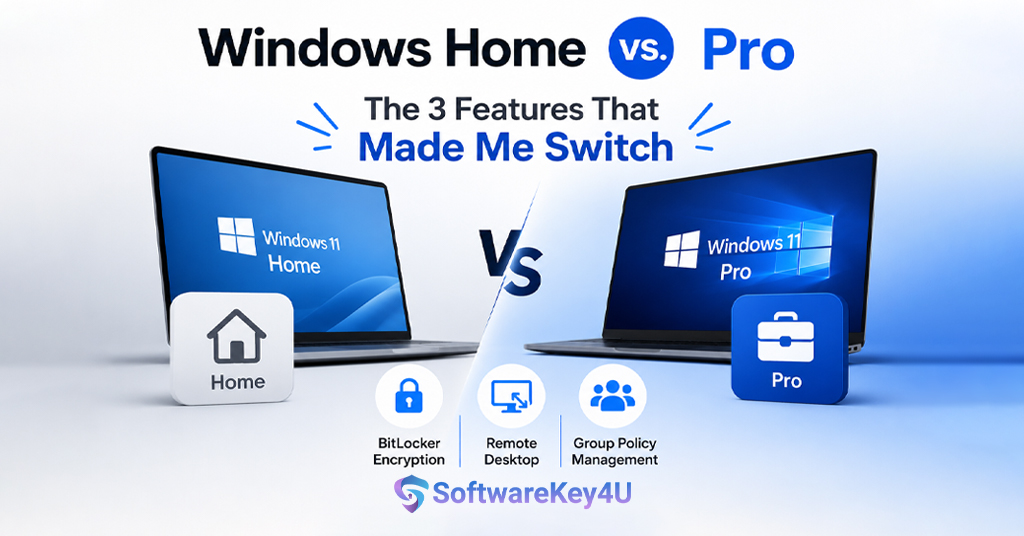
Windows 11 Home vs Pro: What’s the Difference?
Not sure which version you need? Here’s a quick comparison:
| Feature | Home | Pro |
|---|---|---|
| BitLocker | No | Yes |
| Remote Desktop | No | Yes |
| Group Policy Editor | No | Yes |
| Business Use | Limited | Full Support |
| Price | Lower | Higher |
If you’re a casual user, Home is fine. If you need business tools, go with Pro.
What Happens If You Don’t Upgrade?
You can still use Windows 10 for now. Microsoft will support it until October 14, 2025. After that, no more updates or security patches.
Staying on Windows 10 is okay short-term. But switching to PC Ready for Windows 11 ensures long-term security and features.
Common Windows 11 Installation Errors (and Fixes)
Sometimes, things don’t go smoothly. Here are a few common upgrade errors and what you can do:
-
TPM not detected: Enable it in BIOS.
-
Secure Boot off: Turn it on in BIOS settings.
-
Storage space low: Free up at least 64 GB before installing.
-
Update stuck: Restart and retry. Use the Media Creation Tool if needed.
How to Check Your BIOS Version
Your BIOS might need an update before enabling TPM or Secure Boot. Here’s how to check:
-
Press Windows + R, type
msinfo32, then hit Enter. -
Look for “BIOS Version/Date.”
-
Visit your PC maker’s site to see if a newer version is available.
Always follow official instructions when updating BIOS.
Can You Downgrade Back to Windows 10?
Yes, but only within 10 days after installing Windows 11. After that, you’ll need a clean install of Windows 10. To roll back:
-
Go to Settings > System > Recovery > Go back
-
Follow the steps
-
Make sure you backed up your data first
Windows 11 Accessibility Features
Windows 11 is built to include everyone. Some helpful tools:
-
Live Captions
-
Voice Typing
-
Magnifier
-
High contrast themes
-
Narrator screen reader
These make Windows 11 more friendly for all users.
How to Stay Updated After Installation
Once you install Windows 11, keep it running well. Here’s how:
-
Turn on automatic updates
-
Check for driver updates often
-
Install optional updates for fixes
-
Scan with Windows Security weekly
Regular updates keep your PC fast and safe.
Is Your Internet Connection Ready?
A strong internet connection helps ensure a smooth upgrade.
-
Stable Wi-Fi or Ethernet is a must during installation.
-
Many features in Windows 11 also rely on being online.
-
Activation, updates, and syncing with Microsoft accounts need internet.
So, make sure your PC is connected before starting.
What Devices Come with Windows 11 Pre-installed?
Many new laptops and desktops already ship with Windows 11.
-
Brands like HP, Dell, Lenovo, and ASUS offer Windows 11 devices.
-
These are optimized for better performance and longer support.
-
If upgrading seems hard, buying a pre-installed device is an easy option.
What If You Use Unsupported Hardware?
Microsoft allows installing Windows 11 on unsupported PCs—but it’s risky.
-
You might miss updates or face security issues.
-
Performance could drop.
-
Microsoft offers no guarantee of future support.
Use this path only if you’re comfortable with advanced setup steps.
What About Older Apps and Programs?
Good news—most apps that work on Windows 10 also work on Windows 11.
-
Check software sites for compatibility updates.
-
Look for 64-bit versions if needed.
-
You can also run older apps in compatibility mode.
Still, always test key programs after upgrading.
How to Free Up Space for Windows 11
Low storage is a common issue before upgrade. Try these steps:
-
Delete temporary files: Use Disk Cleanup or Settings > Storage.
-
Uninstall unused apps.
-
Move large files to external drives or cloud.
-
Empty Recycle Bin.
You need at least 64 GB free for a smooth install.
PC Ready for Windows 11
Tips Before Upgrading For PC Ready for Windows 11
-
Check storage space (at least 64 GB needed)
-
Make sure your apps support Windows 11
-
Update your drivers
-
Write down any passwords or product keys
-
Charge your laptop fully before starting
A little prep goes a long way.
You can download all software link from here.
Final Thoughts
Upgrading to PC Ready for Windows 11 isn’t hard. But it starts with knowing if your PC Ready for Windows 11. Use the tools we shared. Enable TPM and Secure Boot if needed. Then back up your files and start the upgrade.
With its new design and better security, Windows 11 brings your PC into the future. So why wait? Check today and make your move when you’re ready and PC Ready for Windows 11.